

What is the Infrared Module used for?

The IR module and a remote control can be used with an Arduino to enable wireless communication and control of electronic devices. Infrared communications are widely used for remote control applications, like controlling TVs, air conditioners, and other appliances.
Updated Information:
This guide has been re-written because of the latest update to the IRremote.h library. The old code from version 2 of the library that I used for this guide in 2020 no longer works with the latest update. Make sure you’re using the latest version of the library before following along with this guide.
Components Required:
- Arduino board (e.g., Arduino Uno)
- IR Receiver Module (e.g., TSOP38238)
- IR Remote control (usually comes with the IR module)
- Jumper wires
- Breadboard (optional)
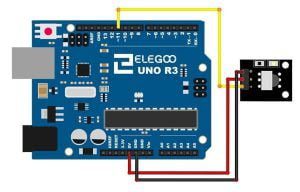
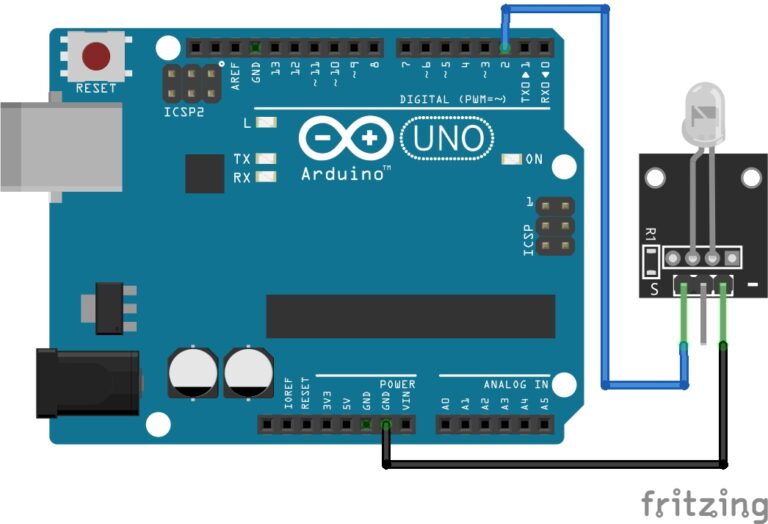
Connect the IR Module:
- Connect the VCC (Power) pin of the IR module to 5V on the Arduino.
- Connect the GND (Ground) pin of the IR module to GND on the Arduino.
- Connect the OUT (Output) pin of the IR module to any digital pin on the Arduino (e.g., Pin 11).
Install IR Library:
- To work with IR communication, you’ll need to install the “IRremote” library. You can do this using the Arduino Library Manager. If you do not know how to do this, you can follow our guide here: Arduino Libraries
Write Arduino Code:
- Here’s a basic example of Arduino code to get you started:
/*This is the V3 version,
  makesure you have updated your IRremote.h library*/
#include <IRremote.h>
#define IR_RECEIVE_PIN 11

void setup(){
  Serial.begin(9600);
  IrReceiver.begin(IR_RECEIVE_PIN);
}

void loop() {
  if (IrReceiver.decode()) {
    IrReceiver.resume();
    Serial.println(IrReceiver.decodedIRData.command);
  }
}
This code sets up the Arduino to receive IR signals and print the value of the received signal to the serial monitor.
Capture Remote Codes:
- Upload the code to your Arduino and open the Serial Monitor. Point your remote control at the IR receiver and press buttons. You should see hexadecimal values corresponding to the button presses.
Use the Codes:
- Once you have captured the IR codes for various buttons on your remote, you can use these codes in your Arduino projects to perform actions based on the button presses. For example, you can control LEDs, motors, or other devices.
Customize Your Project:
- Depending on your project, you can define specific actions or functions to execute when certain IR codes are received. This allows you to create custom remote-controlled applications.
That’s the basic overview of using an IR module and remote with an Arduino. It’s a versatile way to add remote control capabilities to your electronic projects.
Let's Build!
Key Mapping
We can remotely control the Arduino with the infrared receiver module and a remote control.
The Code:
/*This is the V3 version,
  makesure you have updated your IRremote.h library*/
#include <IRremote.h>
#define IR_RECEIVE_PIN 11

void setup(){
  Serial.begin(9600);
  IrReceiver.begin(IR_RECEIVE_PIN);
}

void loop() {
  if (IrReceiver.decode()) {
    IrReceiver.resume();
    Serial.println(IrReceiver.decodedIRData.command);
  }
}
In the void setup() we start the receiver using IrReceiver.begin.
In the void loop() we call for input to decode and then print it to the serial monitor
The Circuit:
Upload the Code:
Now upload your code and begin mapping each button. What I mean by this is note down the code received from each button press. It’s Important to know, holding down the button for too long will result in a different code being returned, for now we just want the basic code for each button.
If you are using the same Elegoo Super Starter Kit as me then you can likely skip the last part, but i recommend you at least run it once and make sure the codes match with my next code example.
Keys Mapped
You could sit there and map all the keys yourself, I even recommend you do, but I have done all the boring work for you. If by some slim chance the mappings are actually different, then you will need to do this entire process for yourself.
The Code:
/*This is the V3 version,
  makesure you have updated your IRremote.h library*/
#include <IRremote.h>
#define IR_RECEIVE_PIN 11

void setup(){
  Serial.begin(9600);
  IrReceiver.begin(IR_RECEIVE_PIN);
}

void loop() {
  if (IrReceiver.decode()) {
    IrReceiver.resume();
    Serial.println(IrReceiver.decodedIRData.command);
  }
  while(IrReceiver.decode()==0) {
  }
  IrReceiver.resume();
  if (IrReceiver.decodedIRData.command == 22) {
    Serial.println(IrReceiver.decodedIRData.command);
    Serial.println("0 was pressed");
  }
  if (IrReceiver.decodedIRData.command == 12) {
    Serial.println(IrReceiver.decodedIRData.command);
    Serial.println("1 was pressed");
  }
  if (IrReceiver.decodedIRData.command == 24) {
    Serial.println(IrReceiver.decodedIRData.command);
    Serial.println("2 was pressed");
  }
  if (IrReceiver.decodedIRData.command == 94) {
    Serial.println(IrReceiver.decodedIRData.command);
    Serial.println("3 was pressed");
  }
  if (IrReceiver.decodedIRData.command == 8) {
    Serial.println(IrReceiver.decodedIRData.command);
    Serial.println("4 was pressed");
  }
  if (IrReceiver.decodedIRData.command == 28) {
    Serial.println(IrReceiver.decodedIRData.command);
    Serial.println("5 was pressed");
  }
  if (IrReceiver.decodedIRData.command == 90) {
    Serial.println(IrReceiver.decodedIRData.command);
    Serial.println("6 was pressed");
  }
  if (IrReceiver.decodedIRData.command == 66) {
    Serial.println(IrReceiver.decodedIRData.command);
    Serial.println("7 was pressed");
  }
  if (IrReceiver.decodedIRData.command == 82) {
    Serial.println(IrReceiver.decodedIRData.command);
    Serial.println("8 was pressed");
  }
  if (IrReceiver.decodedIRData.command == 74) {
    Serial.println(IrReceiver.decodedIRData.command);
    Serial.println("9 was pressed");
  }
  if (IrReceiver.decodedIRData.command == 69) {
    Serial.println(IrReceiver.decodedIRData.command);
    Serial.println("Power was pressed");
  }
  if (IrReceiver.decodedIRData.command == 70) {
    Serial.println(IrReceiver.decodedIRData.command);
    Serial.println("Vol+ was pressed");
  }
  if (IrReceiver.decodedIRData.command == 21) {
    Serial.println(IrReceiver.decodedIRData.command);
    Serial.println("Vol- was pressed");
  }
  if (IrReceiver.decodedIRData.command == 71) {
    Serial.println(IrReceiver.decodedIRData.command);
    Serial.println("Func/stop was pressed");
  }
  if (IrReceiver.decodedIRData.command == 64) {
    Serial.println(IrReceiver.decodedIRData.command);
    Serial.println("Play/pause was pressed");
  }
  if (IrReceiver.decodedIRData.command == 68) {
    Serial.println(IrReceiver.decodedIRData.command);
    Serial.println("Back/rewind was pressed");
  }
  if (IrReceiver.decodedIRData.command == 67) {
    Serial.println(IrReceiver.decodedIRData.command);
    Serial.println("Next/fast forward was pressed");
  }
  if (IrReceiver.decodedIRData.command == 25) {
    Serial.println(IrReceiver.decodedIRData.command);
    Serial.println("EQ was pressed");
  }
  if (IrReceiver.decodedIRData.command == 13) {
    Serial.println(IrReceiver.decodedIRData.command);
    Serial.println("ST/REPT was pressed");
  }
  if (IrReceiver.decodedIRData.command == 9) {
    Serial.println(IrReceiver.decodedIRData.command);
    Serial.println("UP was pressed");
  }
  if (IrReceiver.decodedIRData.command == 7) {
    Serial.println(IrReceiver.decodedIRData.command);
    Serial.println("DOWN was pressed");
  }
}
Upload the Code:
Upload the code to your Arduino board. As you can see in the code, I have created conditional statements for each of the buttons. If a button was pressed and the returned code matches the condition, the correct button will be printed to the serial monitor. Play around with your remote and check every button returns the correct result, this will be very important for the final project we are working towards in this series of guides.
Simple LED Light Control Using the IR Receiver Module
With the IR remote keys mapped we can now begin to control some components using the remote control. First, we start simple and control some LEDS.
The Code:
#include <IRremote.h>
#define IR_RECEIVE_PIN 11
#define RED 6
#define GREEN 5
#define BLUE 3
void setup(){
Serial.begin(9600);
IrReceiver.begin(IR_RECEIVE_PIN);
pinMode(RED,OUTPUT);
pinMode(GREEN,OUTPUT);
pinMode(BLUE,OUTPUT);
}
void loop() {
if (IrReceiver.decode()) {
IrReceiver.resume();
Serial.println(IrReceiver.decodedIRData.command);
}
while(IrReceiver.decode()==0) {
}
IrReceiver.resume();
if (IrReceiver.decodedIRData.command == 12) {
Serial.println(IrReceiver.decodedIRData.command);
Serial.println("1 was pressed");
digitalWrite(RED,HIGH);
digitalWrite(GREEN,LOW);
digitalWrite(BLUE,LOW);
}
if (IrReceiver.decodedIRData.command == 24) {
Serial.println(IrReceiver.decodedIRData.command);
Serial.println("2 was pressed");
digitalWrite(RED,LOW);
digitalWrite(GREEN,HIGH);
digitalWrite(BLUE,LOW);
}
if (IrReceiver.decodedIRData.command == 94) {
Serial.println(IrReceiver.decodedIRData.command);
Serial.println("3 was pressed");
digitalWrite(RED,LOW);
digitalWrite(GREEN,LOW);
digitalWrite(BLUE,HIGH);
}
if (IrReceiver.decodedIRData.command == 64) {
Serial.println(IrReceiver.decodedIRData.command);
Serial.println("Play/pause was pressed");
for(int disco=0; disco<=10;disco++){
digitalWrite(RED,HIGH);
digitalWrite(GREEN,LOW);
digitalWrite(BLUE,LOW);
delay(200);
digitalWrite(RED,LOW);
digitalWrite(GREEN,HIGH);
digitalWrite(BLUE,LOW);
delay(200);
digitalWrite(RED,LOW);
digitalWrite(GREEN,LOW);
digitalWrite(BLUE,HIGH);
delay(200);
digitalWrite(RED,LOW);
digitalWrite(GREEN,LOW);
digitalWrite(BLUE,LOW);
if (IrReceiver.decodedIRData.command == 69) {
Serial.println(IrReceiver.decodedIRData.command);
Serial.println("Power was pressed");
digitalWrite(RED,LOW);
digitalWrite(GREEN,LOW);
digitalWrite(BLUE,LOW);
}
}
}
if (IrReceiver.decodedIRData.command == 69) {
Serial.println(IrReceiver.decodedIRData.command);
Serial.println("Power was pressed");
digitalWrite(RED,LOW);
digitalWrite(GREEN,LOW);
digitalWrite(BLUE,LOW);
}
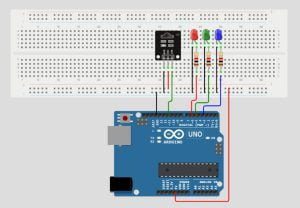
}The Circuit:
Assemble your components the exact same way as in the image below. Don’t forget the resistors to limit the current sent to the LEDs.
Upload the Code:
If you took a good look at the code, you would notice that five conditions were created.
- Red LED will illuminate if button 1 was pressed.
- Green LED will illuminate if button 2 was pressed.
- Blue LED will illuminate if button 3 was pressed.
- Disco light show would begin if the play button was pressed.
- All LEDs would turn off if the power button was pressed.
Upload the code to your Arduino and try it for yourself. Take note, the LEDs cannot be stopped during the Disco light show until it has completed each iteration through the loop.
IR Ambiant Light Control with RGB
The Code:
#include <IRremote.h>
#define IR_RECEIVE_PIN 11
long data = 0;
int redPin = 6;
int greenPin = 5;
int bluePin = 3;
void setup() {
  Serial.begin(9600);
  IrReceiver.begin(IR_RECEIVE_PIN, ENABLE_LED_FEEDBACK);
  pinMode(redPin, OUTPUT);
  pinMode(bluePin, OUTPUT);
  pinMode(greenPin, OUTPUT);
}
void loop() {
  if (IrReceiver.decode()) {
    if (IrReceiver.decodedIRData.command != 0) {
      data = IrReceiver.decodedIRData.command;
    }
    switch (data) { // compare the value to the following cases
      //button 0
      case 22:
        Serial.println("0, white");
        setLed(255, 255, 255);
        break ;
      //button 1,2,3
      case 12:
        Serial.println("1, Red");
        setLed(255, 0, 0);
        break ;
      case 24:
        Serial.println("2, Green");
        setLed(0, 255, 0);
        break ;
      case 94:
        Serial.println("3, Blue");
        setLed(0, 0, 255);
        break ;
      //button 4,5,6
      case 8:
        Serial.println("4, brown");
        setLed(153, 76, 0);
        break ;
      case 28:
        Serial.println("5, Yellow");
        setLed(255, 255, 0);
        break;
      case 90:
        Serial.println("6, Orange");
        setLed(255, 100, 0);
        break ;
      //button 7,8,9
      case 66:
        Serial.println("7, Violet");
        setLed(255, 0, 255);
        break ;
      case 82:
        Serial.println("8, Pink");
        setLed(255, 100, 255);
        break;
      case 74:
        Serial.println("9, Indigo");
        setLed(127, 0, 255);
        break ;
      //play, forward,...
      case 64:
        Serial.print("play, Disco");
        for(int disco=0; disco<=10; disco++){
          setLed(255, 0, 0);
          delay(200);
          setLed(0, 255, 0);
          delay(200);
          setLed(0, 0, 255);
          delay(200);
        }
        setLed(0, 0, 0);
        IrReceiver.resume();
        break;
      case 67:
        Serial.println("Next, strobe");
        for(int strobe=0; strobe<=100; strobe++){
          setLed(255, 255, 255);
          delay(100);
          setLed(0, 0, 0);
          delay(100);
        }
        IrReceiver.resume();
        break;
      case 69:
        Serial.println("power off");
        setLed(0,0,0);
        break;
      }
    IrReceiver.resume();
  }
}
void setLed(int r, int g, int b){
  analogWrite(redPin, r); analogWrite(greenPin, g); analogWrite(bluePin, b);
}
Study the code, we have some new additions. We have used long instead of int they are the same except long can hold more data, an int can hold 2 bytes, a long can hold 4.
The Arduino’s switch case is a control structure that allows us to choose different code blocks based on a variables value. We set data to the IR receiver command then put data in the switch structure, each case is data code received when a button on the remote is pressed.
This code was adapted from code found on https://community.dfrobot.com/makelog-312062.html
I was looking for new examples that work with the new library, this wasn’t what I was looking for but figured the switch case control structure would be a great addition to show you.
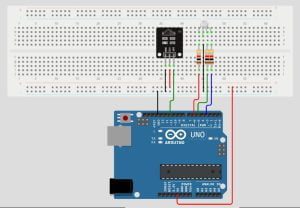
The Circuit:
Assemble your components the exact same way as in the image below. It’s a simple case of removing the LEDs from the previous project and inserting the RGB in their place and removing the GND jumpers except one. Make sure to insert the correct leg of the RGB to its corresponding pin hole on the breadboard.
Upload the Code:
Once you have uploaded the code to your Arduino, you will notice we have a variety of colors to pick from. This gives us the ability to create great ambient lighting projects for enhancing your surroundings.
Conclusion
Harnessing the power of an IR module to control LEDs and RGBs for ambient lighting opens up a world of possibilities for enhancing the atmosphere in your living space. Whether you’re looking to create a cozy, relaxing environment or add a touch of excitement to your room, this DIY project is a fantastic choice. By interfacing an Arduino with an IR module and a remote control, you can achieve precise control over your lighting setup. The versatility of this technology allows you to change colors, adjust brightness, and even trigger dynamic lighting effects, all at the touch of a button.
Recommendations:
If you don’t already own any Arduino hardware, we highly recommend purchasing the Elegoo Super Starter Kit. This kit has everything you need to start programming with Arduino.
You can find out more about this kit here: Elegoo Super Starter Kit
