
Introductions to Math Operators
Math operators in Arduino let you do cool calculations for your projects! These tools help you add, subtract, multiply, divide, and more with numbers. For example, you can use them to control LEDs or calculate sensor data. Also, like in other coding languages, Arduino’s math operators are easy to learn. So, get ready to crunch numbers and build fun projects with simple arithmetic and logic!
Basic Math Operators in Arduino
To begin, here are some of the most commonly used Arduino math operators:
Assignment (=) – First, the assignment operator is used to assign a value to a variable.
int x = 10; // x is assigned the value 10
Addition (+) – Next, the addition operator is used to add two or more numbers together.
int result = 5 + 3; // result will be 8
Subtraction (-) – Also, the subtraction operator is used to subtract one number from another.
int result = 10 - 4; // result will be 6
Multiplication (*) – Next, the multiplication operator is used to multiply two or more numbers.
int result = 6 * 7; // result will be 42
Division (/) – The division operator is used to divide one number by another.
float result = 15.0 / 2.0; // result will be 7.5
Modulus (%) – Additionally, the modulus operator is used to find the remainder when one number is divided by another.
int remainder = 10 % 3; // remainder will be 1
Increment (++) and Decrement (–) – Finally, these operators are used to increase or decrease the value of a variable by 1, respectively.
int count = 5; // count is 5
count++; // count is now 6
count--; // count is now 5 again
Compound Assignment Math Operators (+=, -=, *=, /=, %=)
Next, compound assignment operators in Arduino combine a math operation with assignment, making your code shorter and easier. Furthermore, they update a variable’s value by performing an operation on it. For example, instead of writing
count = count + 1
you can use a compound operator to do it faster like this
count += 1
These are great for young learners to simplify coding tasks like adjusting LED brightness or tracking sensor data.
Comparison Math Operators (==, !=, , =)
Now, comparison operators in Arduino let you compare values to make decisions in your code. In fact, they check if numbers are equal, greater, or smaller, returning true or false. For example, you can use them to turn on an LED if a sensor value is high. These are perfect for young learners to control Arduino projects like alarms or lights. Below, we list each comparison operator with simple explanations and examples.
Even or Odd Checker Project
In this fun Arduino project, you’ll use the modulus operator (%) to check if a number you type is even or odd! Then, you’ll enter a number in the Serial Monitor, and Arduino will tell you the result. In fact, it’s a great way to practice math operators and make your code interactive.
Step-by-Step Instructions:
Connect Your Arduino:
First, Plug one end of the USB cable into your Arduino board. Then, plug the other end into your computer’s USB port. Now, look for a light on your Arduino to confirm it’s powered on.
Open the Arduino IDE:
Next, start the Arduino IDE on your computer.
Set the Correct Board:
Now, in the Arduino IDE, go to the Tools menu. Then, select Board > Arduino Uno.
Set the Correct Port:
Next, in the Tools menu, select Port. Choose the port with your Arduino’s name (e.g., COM3). Consequently, if you don’t see a port, check your USB connection.
Copy and Paste the Code:
Finally, copy the code below into a new sketch in the Arduino IDE. To start a new sketch, click File > New and paste the code.
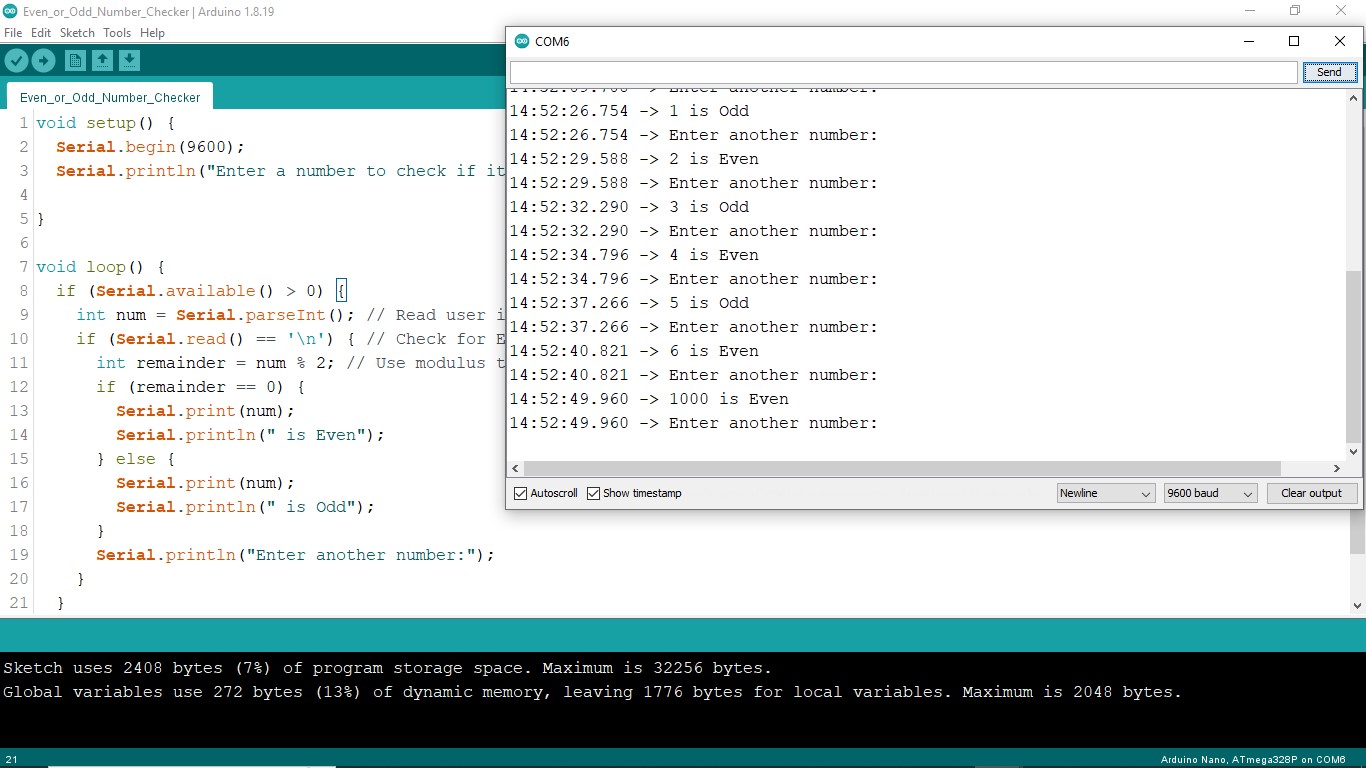
Project Code
void setup() {
  Serial.begin(9600);
  Serial.println("Enter a number to check if it's even or odd:");
}

void loop() {
  if (Serial.available() > 0) {
    int num = Serial.parseInt(); // Read user input as integer
    if (Serial.read() == '\n') { // Check for Enter key
      int remainder = num % 2; // Use modulus to find remainder
      if (remainder == 0) {
        Serial.print(num);
        Serial.println(" is Even");
      } else {
        Serial.print(num);
        Serial.println(" is Odd");
      }
      Serial.println("Enter another number:");
    } // End of input
  } // End of loop
}
Upload the Code:
Now, click the Upload button (right arrow) in the Arduino IDE.
Then, wait for the “Done uploading” message at the bottom.
However, if you get an error, double-check your board and port settings.
Open the Serial Monitor:
Next, in the Arduino IDE, click Tools > Serial Monitor or the magnifying glass icon.
Set the Correct Baud Rate:
Finally, in the Serial Monitor, set the baud rate to 9600 in the dropdown (bottom right). Now, you’ll see “Enter a number to check if it’s even or odd:” in the Serial Monitor.
Test Your Project:
Next, type a whole number (like 7 or 10) in the Serial Monitor’s input box. Press Enter on your keyboard. Consequently, the Serial Monitor will show if the number is even or odd (e.g., “7 is Odd”).
How It Works:
First, the code starts the Serial Monitor and asks for a number.
Next, you type a number (like 7) and press Enter.
Then, Serial.parseInt() reads your number.
After that, the modulus operator (%) divides it by 2 to find the remainder.
For example, 7 % 2 = 1 (odd), and 10 % 2 = 0 (even).
Finally, the Serial Monitor shows if the number is even or odd.
Conclusion
Math operators are super fun in Arduino Bootcamp! First, you learned basic operators like +, -, *, /, and % to crunch numbers. Next, compound assignment operators made your code shorter and cooler. Then, comparison operators helped you make smart decisions, like turning on LEDs. Therefore, these tools are key for building awesome projects. Plus, your Even or Odd Checker project showed how to use the modulus operator with the Serial Monitor. So, keep practicing these operators! For example, try them in new sketches to control lights or sensors. Ultimately, mastering math operators opens the door to exciting Arduino creations. Now, go code and have fun!
Congratulations! You’ve completed another exciting lesson in the Arduino Bootcamp. So, what’s next? Keep experimenting. And most of all, keep building.
Great job, we’ll see you in the next lesson!
Finally, if you have any questions or want to share your projects? Connect with us on X/Twitter for more tips and inspiration!
Ready for more? click Next to continue learning.