
It Doesn't get More Retro Than This!
Ready for some more Arduino gaming? “Pong” is one of the earliest arcade video games and was released by Atari, Inc. The exact release date of “Pong” was November 29, 1972. It was designed by Atari founder Nolan Bushnell and became one of the first commercially successful video games, helping to establish the video game industry. Today we are going to play the Nano Pong game on the Arduino Nano. Excited yet?
How to Play Nano Pong On the Arduino
Components:
To follow along with this guide, you will need the following components:
- Arduino board (e.g., Arduino Uno, Arduino Nano, etc.)
- Mini OLED display with compatible interface (I2C)
- Tactile Switches (X2)
- Buzzer (X1)
- Jumper wires
- Breadboard
The Code:
Copy and paste the code below to a new sketch in your Arduino IDE. You can find the original release here on GitHub: pong.ino.
/*
  A simple Pong game.
  https://github.com/eholk/Arduino-Pong/blob/master/pong.ino
*/
#include <SPI.h>
#include <Wire.h>
#include <Adafruit_GFX.h>
#include <Adafruit_SSD1306.h>

#define UP_BUTTON 2
#define DOWN_BUTTON 3
const unsigned long PADDLE_RATE = 64;
const unsigned long BALL_RATE = 16;
const uint8_t PADDLE_HEIGHT = 12;
const uint8_t SCORE_LIMIT = 9;
Adafruit_SSD1306 display = Adafruit_SSD1306(128, 64, &Wire);
bool game_over, win;
uint8_t player_score, mcu_score;
uint8_t ball_x = 53, ball_y = 26;
uint8_t ball_dir_x = 1, ball_dir_y = 1;
unsigned long ball_update;
unsigned long paddle_update;
const uint8_t MCU_X = 12;
uint8_t mcu_y = 16;
const uint8_t PLAYER_X = 115;
uint8_t player_y = 16;

void setup()
{
    display.begin(SSD1306_SWITCHCAPVCC, 0x3C);
    // Display the splash screen (we're legally required to do so)
    display.display();
    unsigned long start = millis();
    pinMode(UP_BUTTON, INPUT_PULLUP);
    pinMode(DOWN_BUTTON, INPUT_PULLUP);
    display.clearDisplay();
    drawCourt();
    while(millis() - start < 2000);
    display.display();
    ball_update = millis();
    paddle_update = ball_update;
}

void loop()
{
    bool update_needed = false;
    unsigned long time = millis();
    static bool up_state = false;
    static bool down_state = false;
    up_state |= (digitalRead(UP_BUTTON) == LOW);
    down_state |= (digitalRead(DOWN_BUTTON) == LOW);
    if(time > ball_update)
    {
        uint8_t new_x = ball_x + ball_dir_x;
        uint8_t new_y = ball_y + ball_dir_y;
        // Check if we hit the vertical walls
        if(new_x == 0 || new_x == 127)
        {
            ball_dir_x = -ball_dir_x;
            new_x += ball_dir_x + ball_dir_x;
            if (new_x < 64)
            {
                player_scoreTone();
                player_score++;
            }
            else
            {
                mcu_scoreTone();
                mcu_score++;
            }
            if (player_score == SCORE_LIMIT || mcu_score == SCORE_LIMIT)
            {
                win = player_score > mcu_score;
                game_over = true;
            }
        }
        // Check if we hit the horizontal walls.
        if(new_y == 0 || new_y == 53)
        {
            wallTone();
            ball_dir_y = -ball_dir_y;
            new_y += ball_dir_y + ball_dir_y;
        }
        // Check if we hit the CPU paddle
        if(new_x == MCU_X && new_y >= mcu_y && new_y <= mcu_y + PADDLE_HEIGHT)
        {
            mcuPaddleTone();
            ball_dir_x = -ball_dir_x;
            new_x += ball_dir_x + ball_dir_x;
        }
        // Check if we hit the player paddle
        if(new_x == PLAYER_X && new_y >= player_y && new_y <= player_y + PADDLE_HEIGHT)
        {
            playerPaddleTone();
            ball_dir_x = -ball_dir_x;
            new_x += ball_dir_x + ball_dir_x;
        }
        display.drawPixel(ball_x, ball_y, BLACK);
        display.drawPixel(new_x, new_y, WHITE);
        ball_x = new_x;
        ball_y = new_y;
        ball_update += BALL_RATE;
        update_needed = true;
    }
    if(time > paddle_update)
    {
        paddle_update += PADDLE_RATE;
        // CPU paddle
        display.drawFastVLine(MCU_X, mcu_y, PADDLE_HEIGHT, BLACK);
        const uint8_t half_paddle = PADDLE_HEIGHT >> 1;
        if(mcu_y + half_paddle > ball_y)
        {
            int8_t dir = ball_x > MCU_X ? -1 : 1;
            mcu_y += dir;
        }
        if(mcu_y + half_paddle < ball_y)
        {
            int8_t dir = ball_x > MCU_X ? 1 : -1;
            mcu_y += dir;
        }
        if(mcu_y < 1)
        {
            mcu_y = 1;
        }
        if(mcu_y + PADDLE_HEIGHT > 53)
        {
            mcu_y = 53 - PADDLE_HEIGHT;
        }
        // Player paddle
        display.drawFastVLine(MCU_X, mcu_y, PADDLE_HEIGHT, WHITE);
        display.drawFastVLine(PLAYER_X, player_y, PADDLE_HEIGHT, BLACK);
        if(up_state)
        {
            player_y -= 1;
        }
        if(down_state)
        {
            player_y += 1;
        }
        up_state = down_state = false;
        if(player_y < 1)
        {
            player_y = 1;
        }
        if(player_y + PADDLE_HEIGHT > 53)
        {
            player_y = 53 - PADDLE_HEIGHT;
        }
        display.drawFastVLine(PLAYER_X, player_y, PADDLE_HEIGHT, WHITE);
        update_needed = true;
    }
    if(update_needed)
    {
        if (game_over)
        {
            char* text = win ? "YOU WIN!!" : "YOU LOSE!";
            display.clearDisplay();
            display.setCursor(40, 28);
            display.print(text);
            display.display();
            delay(5000);
            display.clearDisplay();
            ball_x = 53;
            ball_y = 26;
            ball_dir_x = 1;
            ball_dir_y = 1;
            mcu_y = 16;
            player_y = 16;
            mcu_score = 0;
            player_score = 0;
            game_over = false;
            drawCourt();
        }
        display.setTextColor(WHITE, BLACK);
        display.setCursor(0, 56);
        display.print(mcu_score);
        display.setCursor(122, 56);
        display.print(player_score);
        display.display();
    }
}
void playerPaddleTone()
{
    tone(11, 250, 25);
    delay(25);
    noTone(11);
}
void mcuPaddleTone()
{
    tone(11, 225, 25);
    delay(25);
    noTone(11);
}
void wallTone()
{
    tone(11, 200, 25);
    delay(25);
    noTone(11);
}
void player_scoreTone()
{
    tone(11, 200, 25);
    delay(50);
    noTone(11);
    delay(25);
    tone(11, 250, 25);
    delay(25);
    noTone(11);
}
void mcu_scoreTone()
{
    tone(11, 250, 25);
    delay(25);
    noTone(11);
    delay(25);
    tone(11, 200, 25);
    delay(25);
    noTone(11);
}
void drawCourt()
{
    display.drawRect(0, 0, 128, 54, WHITE);
}
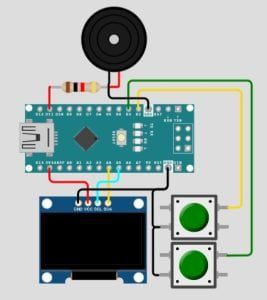
The Circuit:
Assemble your components the exact same way, as shown in the image below. We have used the Arduino Nano here to keep the build compact, but you can use most types of Arduinos for this project (e.g., UNO etc..).
Upload the Code:
Connect your Arduino and upload the code. If you’re missing any libraries, you can install them from the Libraries Manager under the IDE’s Tools menu. To learn how to do this you can follow our guide here: How to Install Arduino Libraries
Conclusion
Playing Pong on the Arduino is a rewarding and educational project that combines retro gaming nostalgia with modern technology. Study the code and you will gain insights into game development on the Arduino. The code is very fairly to follow making it a fantastic way to enhance your Arduino skills.
“Special thanks to eholk on GitHub for creating and sharing the Nano Pong game.”
Happy Gaming!
Recommendations:
The Elegoo Super Starter Kit
If you don’t already own any Arduino hardware, we highly recommend this kit as it has everything you need to start programming with Arduino. You can find out more about this kit, including a list of its components here: Elegoo Super Starter Kit
You can find this kit on Amazon here: Elegoo Super Starter Kit
The 0.96-inch Mini-OLED Display
We highly recommend this mini-OLED bundle of five 0.96-inch OLED displays. We have bought these before and they all worked perfectly. You can read more about the mini-OLED here: Mini-OLED
You can find this bundle on Amazon here: OLED Displays
Elegoo Nano (Arduino Compatible)
We have bought these Nano boards many times and can highly recommend them. There are three Nano boards in this pack making them a total bargain for everyone.
You can find this pack on Amazon here: Arduino Nano
